Return to home page
(LabVIEW driver at the bottom)
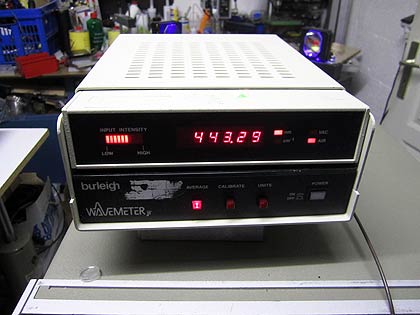
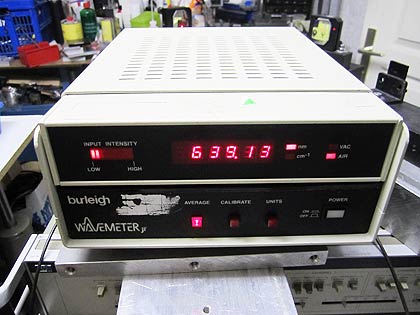
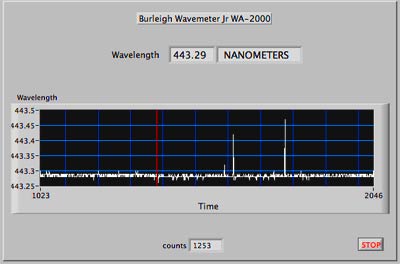
I got recently a moderately good deal for this great little device, which can measure wavelengths from 400-1000nm with 0.01nm resolution. The manual appears to exist on the internet only for the WA-2500, but I couldn't identify any significant difference to the WA-2000 (except for the fiber connector, see below). Here two pics showing the wavelenghts of a blue 1W Nichia diode and of an Opnext HL6385DG diode, both cooled to around 15C. We see that the rule of thumb of 3nm/C wavelength shift fits well for the Opnext diode, which is specified for 642nm at 25C.
It works as a scanning Michelson interferometer. Here a diagram taken from the manual:

It works by counting fringes on the fotodiode, which are induced by the moving mirrors on the right. The device can be calibrated by the push of a button against a HeNe laser, which normalizes the fringe count, and essentially other wavelenghts are determined by comparing the fringe counts.
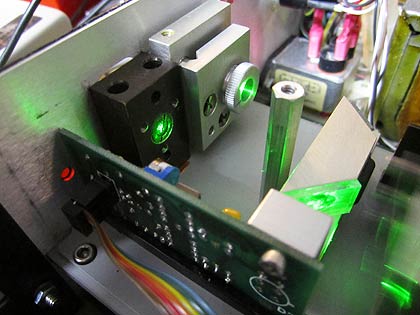
The bulky, original fiber connector (of type "Lamdek" as I learned) was useless, as plugs are not available any more, so I removed it and at first aimed the laser directly into the unit - which was too cumbersome for practical use. So I retrofitted the mounting block by a simple Aixiz collimator by cutting a 9mm fine thread, and also mounted an FC type fiber connector on the outside; I used the adapter from here, which can be easily taken apart. I also noticed that only a single mode fiber would work, so I had to get a patch cable too, and I had to make a similar construction at the other end. As a novice in fibers, I had to spend a good time in adjusting the collimators, apart from the interferometer. In the end everything works perfectly, the sensitiviy at the input of the WA-2000 is about 50uW which is as per specs.
Here a picture of the retrofitted interferometer, the new collimator sits in the dark block to the left; clicking on the picture shows a brief movie of the operating device:
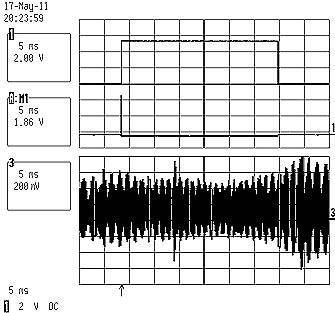
There are several handy outputs on the back, one is the photodiode signal containing the fringes (bottom in the pics below), one is a trigger signal (top) and one shows the actual measurement window (middle), which is adapted to the coherence length in case if it is short. Showing these signals on a scope helps to adjust the input beam, and also allows to crudely judge the spectrum of the laser source by the naked eye. Here some examples:
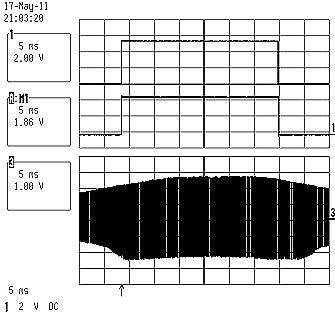
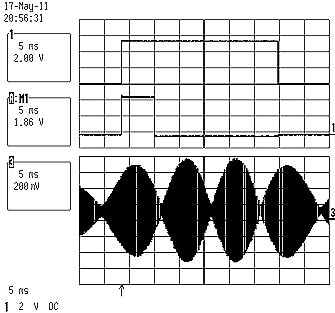
Above left pic: clean single mode fringe pattern of a 642nm ECDL. Right pic: same laser running two longitudinal modes. Obviously the coherence length is reduced; notice the shortened count window signal.
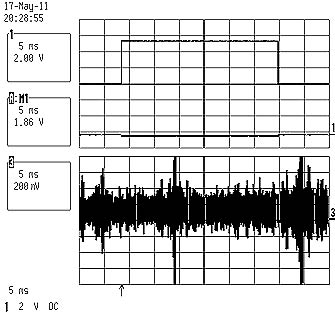
Above left pic: multimode operation of a 445nm 1W Nichia diode. The count window almost disappears, Right pic: chaotic fringe pattern at high power.
Finally, I wanted to integrate the instrument into my computerized measurement setup. There is an RS232 interface on the WA2000/2500, and the problem was how to make use of it for my Mac which has no RS232 port. Fortunately there exist RS232-USB adapters, and also fortunately the one from Logilink I got works flawlessly. Apart from getting that, I had to wire the RS232 port (which has a non-standard pinout) to the DSUB-9 connector; a wiring scheme I found to work by cut and try is here. Moreover I had to make all of this run under LabVIEW, which was the major part of the work. Finally all worked fine, the only flaw being is that LabVIEW (ie, the virtual com port) hangs if one terminates the program not properly, by not using the stop button.
Here is a picture of one of the VI's, and its LabVIEW 8.2 code can be gotten by clicking on it:
Return to home page
Vers. 0.1 -05/11